Showing posts with label dessert. Show all posts

9.20.2012

Apple Dumplings

When fall is in the air, the oven begs to be used. Which is especially good when you have a fridge full of some of autumn's finest..apples!

Lucky me, we've always have a willing bunch of taste testers in our small group. And this recipe was calling from Pinterest, the fridge, the oven....I was sold. And so was everyone else. Definitely a keeper in my book. The only "problem" is that you need ramekins for every serving. Not that I am ever searching for a reason to buy kitchen utensils... :o)


Apple Dumplings
recipe by Midwest Living

  • 5 medium cooking apples, peeled and sliced (5 cups)
  • 3/4 cup apple cider or apple juice
  • 1/2 cup dark-colored corn syrup
  • 1/4 cup sugar
  • 1 teaspoon ground cinnamon
  • 1 teaspoon vanilla
  • 1/4 cup butter or margarine, melted
  • 2 tablespoons cornstarch
  • 1 recipe Pastry for Double-Crust Pie

Directions

  1. In a saucepan, combine the apples and apple cider. Bring to boiling. Reduce heat and simmer, covered, for 5 to 7 minutes or until just tender.
  2. Stir in the corn syrup, sugar, cinnamon, and vanilla. Combine the melted butter or margarine and the cornstarch. Stir into mixture in saucepan.
  3. Cook and stir the mixture over medium-high heat until thickened and bubbly. Remove from heat.
  4. Prepare pastry. Roll out 2/3 of the pastry to form a 15-inch square. Cut into four 7-inch circles. Ease pastry circles into four 10-ounce custard cups or baking dishes. Do not trim edges. Roll out remaining pastry to an 11-inch square. Cut into four 5-inch circles for top crusts.
  5. Fill each pastry-lined dish with 1/4 of the hot apple mixture. Top with remaining crust, cutting slits for steam to escape. Fold extra pastry under bottom crust and seal. Flute edges.
  6. Bake in a 375 degree F oven for 35 to 40 minutes or until crusts are golden. Cool slightly on wire rack. Serve the dumplings warm. Makes 4 servings.

5.21.2012

Chocolate PB Cake

This past Sunday was Jacob's birthday, but since he wasn't going to be in town, we decided to "celebrate" a little early.
I made a chocolate cake with peanut butter filling and crumb coat, chocolate frosting then a chocolate ganache poured over the top. Followed by some chocolate chips for the bottom border and pb balls nested in piped ganache. So rich, so decadent, so good...Too bad I didn't take more time to take pictures in better lighting.

1.29.2012

Snickers Caarmel Corn

So one of my new favorite sites to frequent is Pinterest. There are so many great ideas out there and Pinterest makes it easy to find such ideas and even bookmark them for future use. So when I came across this delicious looking snack, I knew I had to "Pin It" for sometime down the road.
Enthused about popcorn! Don't mind Tony,
he's trying to get something he dropped
Then came the day that Angela and Tony came to hang out at our place loaded with popcorn kernals. We were all craving something sweet when I decided to go to one of my boards and take a gander and see if I could find something that we could whip up. And there it was. Something that would use her kernals and satisfy our sweet tooth. And even luckier for us, we had some snickers in our pantry :o)
Shakin' it with all she's got!
So Angela and I set off to try our hand at this chocolatey caramel goodness. Since she's known for her amazing stovetop popcorn, I let her do her thing while I put together the ingredients for the caramel. It eventually lead to a group effort when Tony got involved to do the shaking to coat the popcorn.
And the result? Deeeeliciousness. Man on man I wish I had some right now. The only qualm is that we didn't sort through the popcorn before coating it so every now and then you would have the misfortune of crunching down on a hard kernal. Which was probably good since it made you slow down and not inhale the entire batch ;o) Definitely keeping this one in our files!


Snickers Caramel Corn
pinned from Six Sisters Stuff (Adapted from Cookies and Cups)

4 quarts popped corn (about 1 cup kernels)
1 cup salted butter
2 cups light brown sugar, packed
1 tsp salt
1/2 cup light corn syrup
1 tsp baking soda
1 cup salted peanuts
30 fun size Snickers bars chopped up
3 oz melted choc chips

  • Preheat oven to 200 degrees.
  • Pop your popcorn and put popcorn and peanuts in a big brown paper grocery bag.
  • Over medium heat boil butter, brown sugar, salt and corn syrup for 5 minutes (stirring constantly). Remove from heat and stir in baking soda. 
  • Pour over popcorn in the brown paper bag, roll closed and shake well. ( It blends so much easier than trying to fit it in a big bowl and stir.) After the popcorn is coated well, spread onto a cookie sheet. 
  • Spread chopped Snickers over top of popcorn and put in oven for 5 minutes. Remove from oven and drizzle melted chocolate over top of popcorn. YUM!
*If not eaten immediately...can be stored in an airtight container.

7.07.2011

Strawberry Shortcakes

I think that I say this every year but it really is true. Strawberries are a definite sign of summer. Over Memorial Day Angela and I whipped up this strawberry shortcake. We thought we had perhaps done something wrong because the dough was not coming out correctly, and sure enough...we did. I misread the directions (i.e. didn't really read them before hand) and got a really sticky goey mess. I tried to fix it, which worked for the most part but because of the good, didn't take pictures because I didn't think it would turn out.
Boy was I wrong. They still did despite our mess up...okay, okay, my mess up. Of course, then I was slightly bummed that I didn't take the time to take pictures before they were gobbled up.
 
Soon enough though, Brad's clinic held a potluck and he asked if I could make the shortcakes again. I quickly jumped at the chance because 1) they were oh so tasty the first time and 2) we had an over abundance of strawberries from our garden; two and a half colanders to be exact.
So I went to work on night making the cakes, and then together Brad and I hulled, cut, and crushed the berries. This time, the dough came together much better and everyone at his work enjoyed them. Another "ace" for America's Test Kitchen.

Strawberry Shortcakes
by America's Test Kitchen

Preparing the fruit first gives it a chance to become truly juicy-just what you want on fresh-made biscuits. The recipe will yield six biscuits and the scraps can be gathered and patted out to yield another biscuit or to; these, though, will not be as tender as the first.

Fruit
2 qts strawberries, hulled
6 Tablespoons sugar

Shortcakes 
2 cups all-purpose flour, plus extra for the counter
5 tablespoons sugar
1 tablespoon baking powder
1/2 teaspoon salt
8 tablespoons (1 stick) unsalted butter, cut into 1/2-inch cubes and chilled
2/3 cup half-and-half
1 large egg, lightly beaten
1 large egg white, lightly beaten

  • For the fruit: Crush 3 cups of the strawberries with a potato masher. Slice the remaining 5 cups of berries and stir into the crushed berries along with the sugar. Let sit at room temperature until the sugar has dissolved and the berries are juicy, about 30 minutes.
  • For the shortcakes: While the berries macerate, adjust an oven rack to the lower-middle position and heat oven to 425 degrees.
  • Pulse together the flour, 3 tablespoons of the sugar, the baking powder and salt in a food processor until combined.  Scatter the butter pieces over the top and process until the mixture resembles coarse cornmeal, about 15 pulses. Transfer to a bowl.
  • Blend the half-and-half with the beaten egg and pour into the bowl with the flour mixture. Stir with a rubber spatula until large clumps form. Turn the mixture onto a lightly floured counter and knead lightly until the dough comes together.
  • Use your fingertips to pat the dough into a 9-by-6-inch rectangle about 1-inch thick. Cut out 6 dough rounds using a floured 2 3/4-inch biscuit cutter. Reform the remaining dough and cut 2 more rounds. Place the rounds 1 inch apart on a parchment-lined baking sheet, brush the tops with the beaten egg white, and sprinkle with remaining 2 tablespoons granulated sugar.
  • Bake the shortcakes until golden brown, about 12 to 14 minutes. Let the shortcakes cool on the baking sheet for at least 10 minutes.
  • To assemble, split each biscuit in half, laying the biscuit bottoms on individual plates.  Spoon a portion of the fruit over each bottom, then top with a dollop of the whipped cream. Cap with the biscuit tops.

7.06.2011

S'more cookies-revisited

Brad's clinic loves hosting potlucks. The great thing about these potlucks is that everyone is invited, from not only the PTs, PTAs, other clinicians/office staff but the patients as well. Earlier this week, Brad's Clinic Director approached him about throwing us a "baby shower" of sorts which includes the ever popular potluck :o)

Brad asked me if I would be able to make some cookies and after considering what sounded good to me, I decided on s'more cookies. I have made s'more cookies before but I didn't have any Hershey bars here so I started to think about how else I could possibly put these together.

And then I came across a variation of cookie that looked perfect. The base was a chocolate chip cookie, then topped with marshmallow and melted chocolate. Now that I could do based on my pantry. However, what about the graham cracker component? So I opted to make the Chocolate Chip Cookie portion of the previous recipe I had tried since it contained Graham Crackers. However, I also noticed that this made a much softer dough...so I added an extra 1/4 cup of both flour and graham in hopes of thickening it up a bit. It worked somewhat but the cookies, even after baked were pretty soft. I think I'll still tweak it a bit in the future but for now, I'll share what I did.

The consensus was a rich yet delicious gooey treat that everyone loved. The few that I didn't take to the clinic, I have been attempting to restrain myself from eating them all in one sitting. That wouldn't really help with this pregnancy weight gain :op. So yes, a "must do". Just a word of warning...marshmallows are a sticky mess. So be sure to try to keep the marshmallow on the cookie and not overflow onto the sheet. Though my pizza stones were easy to clean (I made sure to wash them right away), it was a mess trying to get the cookies off the stone that had the marshmallow overflow and to try to get those off of the wax paper I put them on (thinking that would help..) was even worse. But still, oh. so. good.
sorry, it's the only picture I have!
S'more Cookies, revisited
adapted and mashed recipe from Baked Perfection and Dear Lillie

1 1/2 cups all purpose flour (I used an additional 1/4 cup)
1 cup graham cracker crumbs (I used an additional 1/4 cup)
1 teaspoon baking soda
1 teaspoon salt
1 dash of cinnamon
1 cup (2 sticks) butter, softened
3/4 cup sugar
3/4 cup brown sugar
1 teaspoon vanilla extract
2 eggs
2 cups miniature chocolate chips

Marshmallows
Chocolate chips

  • Preheat oven to 375 degrees.
  • In a medium bowl combine the flour, graham cracker crumbs, baking soda, salt, and dash of cinnamon. In a second larger bowl beat together the butter, sugar, brown sugar and vanilla extract until creamy. Add the eggs one at a time, beating well after each addition. 
  • Slowly beat in the flour mixture until smooth. Stir in the chocolate chips. Drop by rounded tablespoon onto ungreased cookie sheet.
  • Bake for 8 minutes, and remove from the oven. 
  • Cut marshmallows in half while cookies are in oven. When the cookies are done, place marshmallow halves on top, sticky side down, and return to oven for 2 minutes.
  • While cookies are back in, pour chocolate bits into a microwave-safe container and melt for thirty seconds and stir, then melt for 15 and stir and repeat until they are completely melted.
  • Remove cookies from oven, press the now-puffy marshmallows down with a finger or fork, and spoon or drizzle melted chocolate onto the tops.
  • Let cool, then remove to a cookie rack until completely cooled

4.15.2011

Cinnamon Streusal Pizza

Ah yes, another pizza post (Can you tell that I love pizza?)

The inspiration comes from an old childhood favorite, Godfather's Pizza. It used to be that we would frequent Godfather's often, especially for their pizza buffet. I would fill up with hot pepperoni pizza but made sure to always leave room for one of the best desserts of all...Cinnamon Streusal Pizza.

Godfather's Streusel Pizza from their website...Mmm Mmm

I don't remember when this memory popped into my head but I do know that I have made it quite a few times since then. I would say that it's definitely served best warm and is a great way to use up excess pizza dough. It's also super easy to make (to my surprise).

I used yet another pizza crust recipe but didn't bother taking photos since once you make a pizza crust, the process is all pretty much the same. I'm sure you could use any pizza crust though and it would work out great. (Well except for maybe deep dish..) The recipe I used for the crust, I will put at the very end of the post. Also, the directions say to put it in a pizza pan, I just used my pizza stone and once on a cookie sheet and it still turned out well.


Godfather's Streusel Dessert Pizza
from Savory Seasonings

Pizza Dough
1 TBSP butter, melted or 1 TBSP oil (I used butter...oil just didn't seem right to me)
Cinnamon

Streusel
(makes enough mix for 3 pizzas)
1/2 cup plus 1/3 cup bread flour (I used All Purpose Flour and it still turned out great)
1/3 cup white sugar
1/8 cup brown sugar
2 TBSP solid shortening
2 TBSP olive oil

Icing
1/2 - 3/4 cup powdered sugar
1 TBSP water
1/2 tsp. vanilla

  1. Mix together streusel ingredients then side aside.
  2. To make pizza, pat dough into a 12 inch pie pan that has been sprayed with oil, then brush with 1 TBSP melted butter. Sprinkle cinnamon all around buttered crust. 
  3. Top pizza crust with 1/2 - 3/4 cup streusel mix (freeze remaining streusel mix for another pizza). Bake at 450 F for 8 to 9 minutes depending on the thickness of the pizza. 
  4. Cover with aluminum foil halfway through to keep streusel from burning. 
  5. Mix icing ingredients until it is of a drizzle consistency. If it is too thick, then thin with a small amount of water until you have reached your desired thinness. 
  6. When finished baking, top with icing in a circular pinwheel pattern. (As the original poster points out, this can be done easily with the icing in a sandwich bag with the corner trimmed)
 
    *************************************************************************************************************
    Now a note about this recipe. This is the dough that Savory Seasonings used in her Cinnamon Steusal Pizza so I did as well. And because I rarely plan ahead, I usually don't get the opportunity to allow the dough to develop overnight. Sure, not ideal but hey, it still works for the most part!

    Little Caesars Pizza Dough
    from Savory Seasonings

    1 1/4 cups (9.7 oz) warm water (appox. 120° F)
    2 3/4 tsp. dry active yeast
    2 TBSP sugar
    1 TBSP Honey
    1 TBSP Olive Oil
    2 Tsp. Salt
    1 1/2 cups (8 oz.) bread flour or all purpose flour
    1 1/2 cups (8 oz.) whole wheat flour (optional, can use 100% bread flour or all purpose flour)

    • Mix water and yeast in mixing bowl and allow it to proof for 5 minutes. 
    • Mix in sugar, honey and oil. Then mix in 1 cup flour and the salt. Continue mixing in all the remaining flour until you get a nice, soft dough. Knead until dough is soft and smooth (approx. 10 minutes).
    • Finish kneading on a lightly floured surface and shape into a ball. 
    • Place in the refrigerator in a covered container coated with olive oil for overnight. For the perfect flavor, it is best to time making the dough 24 hours before baking the pizza's (for pizza Saturday at 5pm, make your dough Friday at 5pm). If you are short on time you can sacrifice some flavor and make this dough first thing in the morning and place it in the fridge until dinner that evening.

    3 hours before baking: Remove from fridge and either divide dough in half for two 12” pizzas or leave whole for one somewhat thicker 16” pizza. Work each piece of dough into balls. Allow the dough to come back to room temperature (this process generally takes 3 hours).

    45 minutes before baking: With your pizza stone on the bottom rack of your oven, preheat your oven to 475° F to allow the stone to get hot enough (this process generally takes 40-50 minutes).

    15 minutes before baking: Shape dough into desired pizza crust, sprinkle pizza peel, wooden cutting board or upside down cookie sheet with corn meal, flour or rice flour. Place pizza crust on top, then add toppings. Gently slide pizza onto the hot pizza stone and bake for 9-11 minutes.

    10.27.2010

    Heirloom Apple Dumplings

    fall is here! i love it!
    The name of a well known children's book among teachers and the exact sentiments of my emotions when autumn comes around. One beautiful thing about fall, is the apples. Fresh, crisp orchard apples. Not the ones that you can buy in the supermarket but rather the ones you get from a farmer's stand or a small independent grocery store if you can't make it to the orchard yourself. I miss my mitten state.

    With apples, comes lots of warm and tasty apple desserts. And to be honest, I've already gone through about 3 large bags of apples. ^_^  What? I can't help if it I just come across way to many tempting recipes.
    Anyway, my brother's future mother-in-law heard of my love of orchard apples and offered to bring me a large bushel of apples and apple cider. Yes! Yes! Yes!

    My first goal was apple cider donuts, but that is for another day. My second spree came in the form of Apple Dumplings. I had never made these before and after looking at a variety of recipes, realized that "dumplings" is a very loose term as there were quite a bit of variations out there.

    I finally settled on "My Sister's Kitchen", not only because the dumplings looked great but also I became partial to the blog name. It also appeared to be a unique recipe, using an apple peeler/corer/slicer and an entire apple.
    So I flipped on my food processor to blend up some dough and got out my apple peeler/corer/slicer and cranked out some apples and went to work. An hour later, I packed up the dumplings and rode my bike over to my brother's apt to deliver the goods. And goods, they were. Even Angela who had said she was going to swear off sweets couldn't resist.

    Oh, as far as the recipe goes. I got a little over excited and didn't allow the syrup to thicken enough in the beginning but then decided to put it back on the stove top. So when you look at the preliminary pictures, the glaze does look liquidy so please imagine it being more of a thick syrup. Thanks! Oh yeah, and I definitely cut this recipe in half so that I could get 6 servings rather than 12.

    Heirloom Apple Dumplings
    by MySistersKitchen

    Crust: The crust is important, so you can’t use a pre-fab freezer crust.
    • 2 c. shortening
    • 4 c. flour
    • 1 TBSP sugar
    • 1 tsp. salt
    • 1 tsp. baking powder
    • 1 egg
    • 1/2 c. cold water
    • 3 TBSP lemon juice
    • Mix flour, sugar, salt, and baking powder in a large bowl,
     
    then cut in the shortening (we use butter).
     
    • Add egg, water, and lemon juice, and work into the dough until just smooth. Refrigerate.

    Filling:
    • 12 tart baking apples, peeled & cored. (You want the apple to be whole, so if you use the peeler/slicer/corer, which we always do, keep the apple together.)
    • 1 TBSP brown sugar per apple
    • 1 pinch cinnamon per apple
    • 1 tsp. butter per apple

    Sauce:
    • 2 c. water
    • 1 c. sugar
    • 2 TBSP butter
    • 1 tsp. cinnamon
    •  Combine sauce ingredients in saucepan, cook 3 minutes over medium heat until sugar and butter are melted.

    To assemble:
    • Divide the dough into 12 balls. Roll out a ball into a circle about 8-10 inches across. Lay carefully into individual pie plate (we use the disposable tins–about 4 ” across.) Set whole apple into crust, put brown sugar, cinnamon and butter into center hole. 
    • Wrap the dough circle up around the top of the apple and pinch dough closed. Pour a few spoonfuls of sauce over top.
    • Place dumplings on cookie sheet lined with foil. Bake for 8 minutes at 475ºF, then reduce oven to 350ºF and cook for 45 minutes until the apples are soft and the crust is golden.
    • If serving immediately, let cool to an edible temperature, then serve in tins or on plates, with scoop of the best vanilla ice cream you can find.

    • If storing, let cool completely, then wrap each tin/dumpling in aluminum foil and place in a freezer bag. When ready to serve, remove from freezer and let sit on counter for 30-60 minutes, then place in a 400ºF oven until heated (it’s already cooked, remember–just needs reheating.)
    • A note on portions: For someone who is behaving with moderation and discretion, these dumplings are a good size to SPLIT with another person. If, however, you are like US, you will cast discretion to the wind and snarf the whole thing by yourself. A word to the wise….

    9.29.2010

    Fried, Sweet Plantains

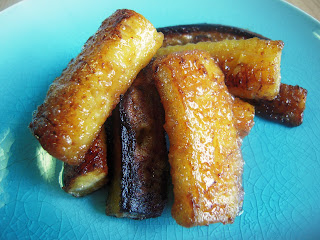
    Yes, I have finally figured it out. After years of frying plantains in oil, wondering why they never come out as nice and sweet as in the restaurant, I have now seen the light! And the answer to this age old mystery is....Butter!
    You see, an old friend of mine names Heidi first showed me how to fry plantains and they were quick tasty and since then, that was the only way I did it. However, the more I ordered plantains out and the more I attempted to recreate at home the more I realized the way I fried plantains wasn't the "correct" way at all to get sweet plantains. Granted, frying in oil is still completely legit as there are numerous ways to fry plantains but if you want that golden, soft, sweetness then butter is the key.

    Ready for one of the easiest recipes on earth?


    Fried Sweet Plantains

    • Take your very ripe plantain (remember, this is a plantain we are talking about so the darker the better/sweeter) and peel it.
     

    • I usually take a paring knife and slice the skin from top to bottom to peel it off as plantain skin is thicker than bananas.


    • Cut as desired. I like spears but discs are fine as well

    • Melt 1-2 Tbsp butter in pan. Place plantains in pan and fry. After about a minute, turn plantains, revealing a golden "skin". Continue to fry evenly, adding a sprinkling of brown sugar to the plantains/pan in its final moments, allowing the sugar to caramelize.

    •  Allow to cool slightly. Serve warm and enjoy!


    8.03.2010

    Blueberry Buckle

    Last week, about this time, Brad sent me an e-mail asking if I could bake him something to take to the barbecue that his work was hosting on Friday. I quickly said yes but then, I have to admit, kind of placed it in the back of my mind due to work. Fast forward to Thursday night, sitting with my co-workers, writing up Medicaid notes when Brad sent me a message. "Did you happen to make a dessert for my barbecue tomorrow?" D-oh!

    He offered to stop by Dominick's. I insisted that I would make something as soon as I got home. I flipped through my rolodex of new dessert options when my mind floated to the now 15 lbs of blueberries in our fridge (Boy, I love blueberry picking!). I then recalled a recipe that I have been wanting to try that my mother-in-law had given to me. My tastebuds were getting excited by the minute.

    My generous and loving mother-in-law holding her great nephew 
    (not my picture but it's one of my favorites!)

     I unfortunately didn't get home until after 11pm but hey, I was committed. As I was reading the recipe, I realized that it called for an 8x8 pan. Since I only have a 9x9 plus Brad was taking this dish to work so I decided to double it to ensure that he had enough. With that said, I am going to post the original recipe, but just know that doubling works well. Because I doubled the recipe, not all of the batter fit in the pan so I used two of my small ramekins to capture and bake up the "overflow". Though the recipe is pretty easy to put together, by the time I got home and settled enough to start throwing things in the mixer, waited for it to bake (which watching my newest documentary on New Kids on the Block-loved it!), and then burning myself pretty fiercely while taking it out of the oven, it was almost 2 am before I went to bed.

    So what was the consensus? Was my late night escapade and burn worth it? Brad said that many people loved it. I know I enjoyed the bursts of blueberries between bites of cake, topped with a sweet cinnamon sugar crunch. In fact, some of you who enjoyed this blueberry dessert may even be reading this now, and it is all thanks to my dearest mother-in-law. I too, thought it was pretty delicious. Though I didn't get a taste (or picture) of the larger portion, I did make sure to enjoy the ramekins the following day. :o)


    Blueberry Buckle

    from my mother-in-law's kitchen


    3/4 cup sugar
    1/4 cup margarine or butter
    1 egg
    1/2 cup milk
    2 cups flour
    2 tsp baking powder
    1/2 tsp salt
    • Mix sugar, butter, and egg. Stir in milk.


    • Blend and sift dry ingredients.


    • Blend 2 cups blueberries (by hand or low speed).

    • Grease pan/put some flour in bottom of 8x8 pan. Pour batter into pan.


    Topping:
    1/2 cup sugar
    1/3 cup flour
    1/2 tsp cinnamon
    1/4 cup butter or margarine
    • Crumble over top of blueberry batter.


    • Bake 40-50 minutes at 375 degrees.

    2.03.2010

    Yum...Cinnamon Rolls...

    The past couple of weeks, I have been crazing Cinnamon Rolls off and on. So one day I decided that I was just going to dive in and make them. But then I went to our pantry and realized that it was down to bare bones because of all the baking I have done lately so instead I went to grocery shopping. The following day I was working until 5 but then after making dinner, running a couple errands, and before I knew it, it was 10 o'clock and I was not about to put baking cinnamon rolls off for another day.

    This recipe was super easy.. Though the original recipe has it titled as "Cinnabon Cinnamon Rolls" I have to be honest and tell you that I haven't had too many Cinnabons so I have no idea how closely these resemble the popular chain but what I can tell you is that it is taking every ounce of my self control to not eat more than one right now ;o). As far as the recipe goes, I made a cinnamon and granulated sugar mixture and then sprinkled a little brown sugar on top of that.
    I also decided to let the rolls rise a second time after placing them in the pan so that they turned out a bit larger and got that support they needed from their neighbors. Finally, I prefer a powder sugar and heavy cream/milk icing only because that I what I grew up on. But I will include the cream cheese icing just for reference.

    Cinnabon Cinnamon Rolls

     by Lightly (from Toasted Todd Wilbur's MORE TOP SECRET RECIPES

      Ingredients

    • 1 (1/4 ounce) package dry yeast 
    • 1 cup warm milk 
    • 1/2 cup granulated sugar 
    • 1/3 cup margarine 
    • 1 teaspoon salt
    • 2 eggs 
    • 4 cups flour

    FILLING

    • 1 cup packed brown sugar 
    • 2 1/2 tablespoons cinnamon 
    • 1/3 cup margarine, softened (or melted in my case)

    Directions

    1. For the rolls, dissolve the yeast in the warm milk in a large bowl.
    2. Add sugar, margarine salt, eggs, and flour, mix well. Knead the dough into a large ball, using your hands dusted lightly with flour.
    3. Put in a bowl, cover and let rise in a warm place about 1 hour or until the dough has doubled in size.
    4. Roll the dough out on a lightly floured surface, until it is approx 21 inches long by 16 inches wide. It should be approx 1/4 thick.
    5. To make filling, combine the brown sugar and cinnamon in a bowl.
    6. Spread the softened margarine over the surface of the dough, then sprinkle the brown sugar and cinnamon evenly over the surface. 

         7. Working carefully, from the long edge, roll the dough down to the bottom edge.

         8. Cut the dough into 1 3/4 inch slices, and place in a lightly greased baking pan.
    (At this point, I allowed the rolls to rise a 2nd time, about 30-40 minutes)
        9. Bake in a 400 degree oven for 10 minutes or until light golden brown.
      10. Ice and Enjoy! 


     Cream Cheese Icing for Cinnamon Rolls (I have yet to try this, I used Powdered Sugar Icing)
    • 8 tablespoons margarine
    • 1 1/2 cups powdered sugar 
    • 1/4 cup cream cheese
    • 1/2 teaspoon vanilla 
    • 1/8 teaspoon salt 
    1. Beat well with an electric mixer until fluffy.
    2. When the rolls are done, spread generously with icing.